
Manual transmission repair involves troubleshooting and rebuilding gearboxes to restore optimal performance. A repair manual provides detailed steps for disassembly, inspection, and reassembly, ensuring precise fixes for professionals and DIYers alike.
Importance of a Repair Manual
A repair manual is essential for manual transmission repair, providing detailed step-by-step instructions, diagrams, and specifications. It ensures technicians and DIYers follow proper procedures, preventing costly mistakes. The manual lists required tools, torque specifications, and troubleshooting tips, making it a vital resource for identifying and resolving issues efficiently. By following the guide, users can disassemble, inspect, and reassemble components correctly. It also highlights safety precautions, such as handling lubricants and replacing bolts with correct specifications. Manuals often include exploded views, helping visualize complex assemblies. Whether for a Tremec, Toyota, or other transmissions, a repair manual is indispensable for ensuring accurate and effective repairs, saving time and avoiding potential damage to the transmission.
Safety Precautions and Tools Needed
Before starting manual transmission repair, ensure safety by wearing protective gear, including gloves and safety glasses. Drain lubricants properly to avoid spills and environmental hazards. Use jack stands to secure the vehicle, never relying solely on a jack. Consult the repair manual for specific tools, such as socket sets, torque wrenches, and pry bars. Replace bolts with ones of the same size and grade as originals to maintain structural integrity. Avoid mixing or over-tightening components, as this can cause irreversible damage. Keep a clean workspace to prevent losing small parts. Always refer to the manual for torque specifications and safety warnings. Proper preparation and adherence to safety guidelines ensure a smooth and successful repair process.
Transmission Disassembly Process
Begin by draining lubricant and positioning the shift lever in Neutral. Remove the gearshift and attaching bolts, then carefully pry the seal between the cover and housing.
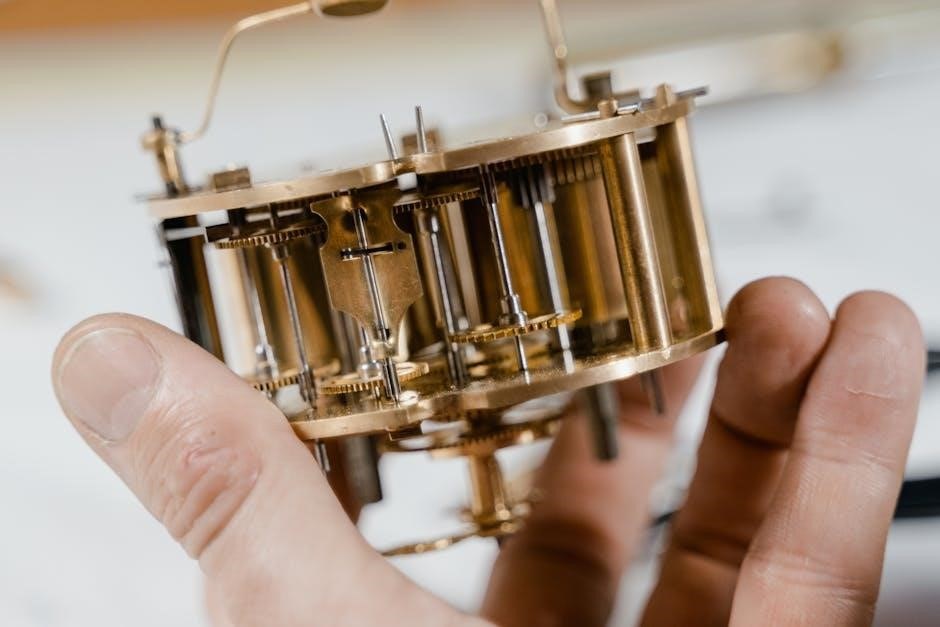
Step-by-Step Guide to Dismantling Components
Dismantling a manual transmission requires precision and organization. Start by removing the gearshift and draining the lubricant. Next, detach the extension housing and input shaft seal. Use a pry bar to break the seal between the cover and housing. Remove bolts securing the main case and bearing retainer. Gently pull apart the housing to access internal components. Extract gears, shafts, and bearings in sequence, noting their positions for reassembly. Use specialized tools, such as bearing pullers, to avoid damage. Keep components organized to ensure proper reinstallation. Refer to the repair manual for torque specifications and alignment guidance. Document each step to simplify the reassembly process later.
Removing the Gearshift and Draining Lubricant
Begin by draining the transmission lubricant, ensuring the vehicle is on level ground. Use a socket wrench to remove the drain plug, allowing the fluid to flow into a pan. Once empty, replace the plug securely. Next, remove the gearshift by taking out the attaching bolts. Gently pull the shift lever away from the transmission. If resistance is encountered, use a pry bar to break the seal between the shift lever and the housing. Be cautious not to damage the surrounding components. Refer to the repair manual for specific bolt sizes and locations. Properly label and store all removed parts to ensure they are reinstalled correctly. This step is critical for accessing internal components and preventing contamination during the repair process.
Extracting Gears, Shafts, and Seals
Extracting gears, shafts, and seals requires precision and care to avoid damage. Start by removing the mainshaft and countershaft, using a puller if necessary. Gears should be lifted out in the order specified by the repair manual to prevent misalignment. Seals are typically removed using a seal puller or a flathead screwdriver, taking care not to scratch the housing. Inspect each component for wear or damage, noting any that need replacement. Use a clean, lint-free cloth to wipe down parts and ensure a contamination-free environment. Properly label and organize all extracted components to simplify reassembly. Always refer to the manual for torque specifications and reinstallation procedures to guarantee accurate and safe reassembly.

Inspecting and Troubleshooting
Inspecting and troubleshooting involve identifying wear, damage, or misalignment in gears, shafts, and bearings. Use specialized tools to measure gear teeth and bearing surfaces for excessive wear.
Identifying Common Issues and Wear
Common issues in manual transmissions include worn gear teeth, damaged bearings, and faulty synchro rings. Inspect gears for pitting, scoring, or excessive wear, and check bearings for play or noise. Synchro rings often show signs of wear, leading to poor gear engagement. Additionally, look for leaks around seals and gaskets, which can indicate lubricant loss. Use a micrometer to measure gear and shaft tolerances, and a dial indicator to check for bearing endplay. Consult the repair manual for specifications to determine if components are worn beyond acceptable limits. Lubrication levels and condition should also be evaluated to ensure proper gear and bearing function. Addressing these issues early prevents further damage and ensures smooth transmission operation.
- Inspect gears for pitting or scoring.
- Check bearings for excessive play or noise.
- Examine synchro rings for wear or damage.
- Measure gear and shaft tolerances with precision tools.
- Ensure proper lubrication levels and condition.
Diagnosing Problems with Gears and Bearings
Diagnosing issues with gears and bearings involves a thorough inspection and testing process. Start by listening for unusual noises, such as grinding or whining, which may indicate worn or damaged components. Visually inspect gears for signs of pitting, scoring, or excessive wear. Use a micrometer to measure gear teeth for wear and a dial indicator to check for bearing endplay or misalignment. Consult the repair manual for specifications to determine if components are within acceptable tolerances. Lubricate moving parts and test operation to identify any remaining issues. If bearings exhibit excessive play or noise, they likely need replacement. Similarly, gears with significant wear should be replaced to prevent further damage to the transmission.
- Listen for abnormal noises during operation.
- Inspect gears for pitting or scoring.
- Measure gear teeth and bearing play with precision tools.
- Replace components that exceed wear limits.

Reassembly of the Transmission
Reassembly involves following the repair manual, reversing disassembly steps, ensuring torque specifications, and properly lubricating bearings and gears for smooth operation.
Reinstalling Gears and Shafts
Reinstalling gears and shafts requires precise alignment and adherence to torque specifications. Begin by lubricating bearings and gears with transmission fluid. Carefully slide the input shaft into the case, ensuring it aligns with the bearings. Follow the repair manual for proper sequence to avoid damage. Install the output shaft and synchronizers, making sure they engage smoothly. Use a bearing press for secure installation. Tighten retaining rings and bolts to the specified torque to prevent loosening. Double-check the alignment of gear teeth and shaft splines. Lubricate all moving parts thoroughly before reassembling the transmission case. Proper installation ensures smooth gear engagement and prevents premature wear.
Replacing Seals and Reattaching Components
Replacing seals and reattaching components is crucial for ensuring proper transmission function. Start by cleaning all surfaces thoroughly to prevent contamination. Apply a thin layer of grease to new seals before installation to ensure a tight fit. Use a seal installer or specialized tools to avoid damaging the seals during installation. Reattach components like the gearshift and extension housing, aligning them carefully to avoid misalignment. Tighten bolts gradually and in a star pattern to maintain even pressure. Replace any worn or damaged gaskets and ensure all connections are secure. Finally, inspect all reattached parts for proper alignment and apply a small amount of lubricant to moving components. This step ensures leak prevention and smooth operation.

Replacing Key Components
Replacing key components involves installing new gears, bearings, and seals using specialized tools for precise alignment and torque specifications to ensure reliability and optimal performance.
Clutch Replacement and Adjustment
Clutch replacement involves removing the old clutch assembly and installing a new one to restore smooth gear engagement. Start by disconnecting the clutch cable and removing the pressure plate. Inspect the flywheel for wear or damage and resurface it if necessary. Install the new clutch disc, aligning it with the pilot bearing. Reattach the pressure plate and reconnect the clutch cable, ensuring proper adjustment. Adjust the clutch pedal to maintain the correct free play, typically 1-2 inches, for optimal performance. Use specialized tools like a clutch alignment tool to ensure precision. Proper adjustment prevents slipping or sticking, ensuring smooth shifting and extending transmission life. Always refer to the repair manual for specific torque specifications and procedural details to guarantee reliability and safety during the process.
Installing New Bearings and Gaskets
Installing new bearings and gaskets is critical for ensuring proper transmission operation. Begin by cleaning the transmission case and bearing surfaces thoroughly. Apply a thin layer of grease to the new bearings before pressing them into place using a bearing installer. Ensure they are seated correctly to avoid damage. For gaskets, inspect the mating surfaces for wear or debris and apply a gasket adhesive if specified. Align the gasket carefully to prevent misplacement. Tighten all bolts in a star pattern to the torque specifications outlined in the repair manual. Proper installation prevents leaks, noise, and premature wear. Always refer to the manual for specific instructions, as incorrect installation can lead to transmission failure. Use specialized tools like bearing pullers and press tools to ensure accuracy and safety during the process.
Testing and Maintenance
After repair, test drive the vehicle to ensure smooth gear shifting and operation. Regularly check transmission fluid levels and replace filters to maintain performance and longevity.
Post-Repair Testing Procedures
After completing the repair, perform a thorough test drive to ensure the transmission operates smoothly. Check for any signs of leaks around seals and gaskets. Monitor the transmission fluid level and top it off if necessary. Test all gear ranges, including reverse, to confirm proper engagement and smooth shifting. Listen for unusual noises or vibrations, which could indicate improper installation or remaining issues. Pay attention to the clutch operation, ensuring it disengages and engages fully without slipping. If equipped, test the overdrive or economy mode to verify proper function. Finally, inspect the vehicle on a lift to ensure all components are securely reattached and functioning as intended.
Scheduling Regular Maintenance
Regular maintenance is crucial to extend the life of a manual transmission and prevent costly repairs. Schedule inspections every 30,000 to 60,000 miles, depending on usage. Check the transmission fluid level regularly and top it off as needed. Replace the fluid every 50,000 to 100,000 miles to maintain optimal lubrication. Inspect the clutch for wear and adjust or replace it if necessary. Lubricate the shift linkage and other moving parts to ensure smooth operation. Additionally, monitor for signs of wear, such as grinding gears or difficulty shifting, and address them promptly. A well-maintained manual transmission can last for decades, providing reliable performance and fuel efficiency. Always refer to your vehicle’s service manual for specific recommendations tailored to your transmission type.